User Manual
Introduction
InfoConnect for Kafka is a lightweight Kafka Connect connector that enables IBM i data replication and event-driven solutions with little to no custom development and no IBM i knowledge required. It is a native Kafka Connect plug-in for companies that already operate, or plan to implement, Kafka infrastructure. The connector is certified by Confluent and is compatible with most Kafka platforms and vendors, such as Apache Kafka, Confluent Platform, Confluent Cloud, IBM Event Streams, Azure Event Hubs, AWS MSK, and Redpanda.
Typical use cases:
- Replicate IBM i data in real time. The connector works natively with InfoCDC and delivers data change events from InfoCDC replication queues to Kafka topics and on to the targets, with no custom IBM i or Kafka development.
- Run IBM i business logic, either by a program call or by automating green screen user actions, based on a message in a Kafka topic.
- Send messages to an IBM i data queue (DQ), or stream messages from a data queue to Kafka topics.
A Kafka-based event-driven platform consists of the following components:
- The core cluster and brokers.
- APIs and SDKs that let message producers and consumers interact with the brokers.
- Kafka Connect clusters that host connectors for source and target systems, including IBM i with InfoConnect for Kafka.
- Data processing and streaming tools.
- Monitoring, alerting, and quality-of-service applications.
- A large ecosystem of third-party applications.
You can run InfoConnect for Kafka as a Kafka Connect plug-in in your existing Kafka ecosystem or in a separate Kafka Connect stack. The following diagram shows a typical Kafka-based data pipeline.
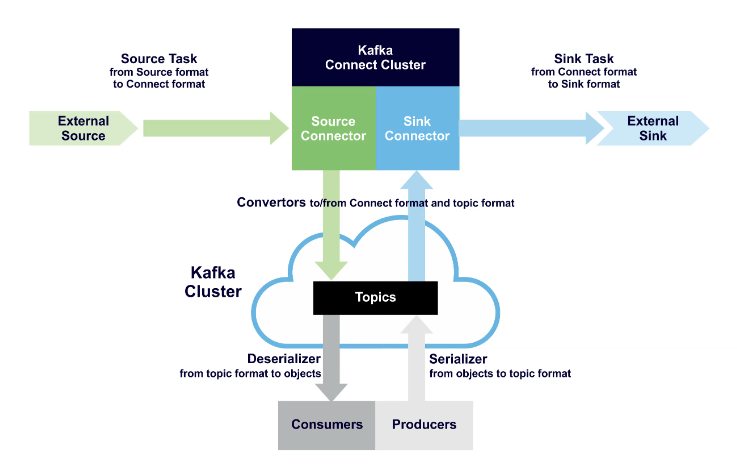
If you do not operate Kafka Connect or Kafka brokers, consider InfoConnect Hub instead. It is a self-contained component that you can deploy anywhere, including directly on IBM i, and that serves as a real-time bridge between IBM i / InfoCDC and messaging platforms.
Hardware, software, and network requirements
IBM i
-
Kafka Connect runtimes that host the InfoConnect for Kafka connectors must be able to reach the IBM i server on the following ports:
- Non-TLS connections: 446, 449, 8470, 8472, 8473, 8475, 8476
- TLS connections: 448, 449, 9470, 9472, 9473, 9475, 9476
-
The following host servers must run in the
QSYSWRKsubsystem:*CENTRAL,*DTAQ,*RMTCMD,*SIGNON, and*SRVMAP. - For a secure TLS connection, apply the TLS certificate to these services in Digital Certificate Manager: Central, Data Queue, Remote Command, Sign-on, and DDM / DRDA. See IBM i TLS configuration for details.
- The IBM i user ID must be authorized to perform operations on the intended IBM i objects.
- If additional security software restricts remote execution, grant the IBM i user ID defined in the connector configuration permission to execute remote calls and to access database, IFS, and DDM services.
Kafka Connect
InfoConnect for Kafka is a lightweight plug-in that runs well even in scaled-down Kafka Connect configurations. The hardware and software requirements depend strongly on the Kafka broker and Kafka Connect edition, vendor, and deployment option.
The Confluent Platform system requirements are a good reference for minimal and production-ready configurations and for supported operating systems.
In our tests and demos, we used a moderately sized Linux VM (16 GB memory and 2 cores) to run a stand-alone Confluent Platform with broker, Schema Registry, and Connect, as well as supporting services such as the management REST API, the Control Center web UI, and ZooKeeper.
Compatibility matrix
| Application/Service | Version |
|---|---|
| Apache Kafka | 3.0.0 or higher |
| IBM i | V5R4 or higher |
Quick start
InfoConnect for Kafka is a set of connectors that run in Kafka Connect workers. The workers interact with the Kafka broker, the core event streaming infrastructure that operates topics, Schema Registry, and other services.
Download the connector from Confluent Hub, even if you use a different Kafka flavor. Download the self-managed Confluent Platform connector ZIP file from that page. Separately, request a trial license.
If you run Kafka Connect in containers, see your Kafka vendor documentation for how to download and install the connector. If you download the connector automatically from Confluent Hub, for example in a Docker build or a CI/CD script, make sure the firewall rules allow downloads from Confluent Hub.
To try the connector together with change data capture or data replication tools, request the InfoCDC installation package and license in addition to the connector. See the InfoCDC documentation for installation and configuration.
The fastest way to try InfoConnect for Kafka depends on whether you already operate a Kafka platform and Kafka Connect infrastructure, and on your Kafka vendor. The following sections describe the three most typical scenarios.
Existing Kafka broker and Kafka Connect infrastructure
Install InfoConnect for Kafka into your existing Kafka Connect environment. Confluent customers can follow the Confluent connector installation instructions, using the Confluent CLI or a manual installation of the downloaded connector. The process is similar for other Kafka vendors and platforms.
You may have to restart the Kafka Connect workers so that they discover the new connector. Then configure the IBM i connector operations.
Existing Kafka broker, no Kafka Connect infrastructure
If you already use Kafka foundation services (such as Kafka topics and Schema Registry) but not Kafka Connect, follow your Kafka vendor instructions to set up a minimal Kafka Connect configuration. For example, Confluent customers can use the Confluent Kafka Connect quick start. The simplest option is stand-alone mode in a development environment.
When Kafka Connect is running and can reach the Kafka broker, download and install the connector as described above. Then configure the IBM i connector operations.
Confluent Cloud as a custom connector
To upload the connectors to Confluent Cloud as custom connectors:
- Download the connector plugin. Download the AS400 connector plugin from Confluent Hub.
-
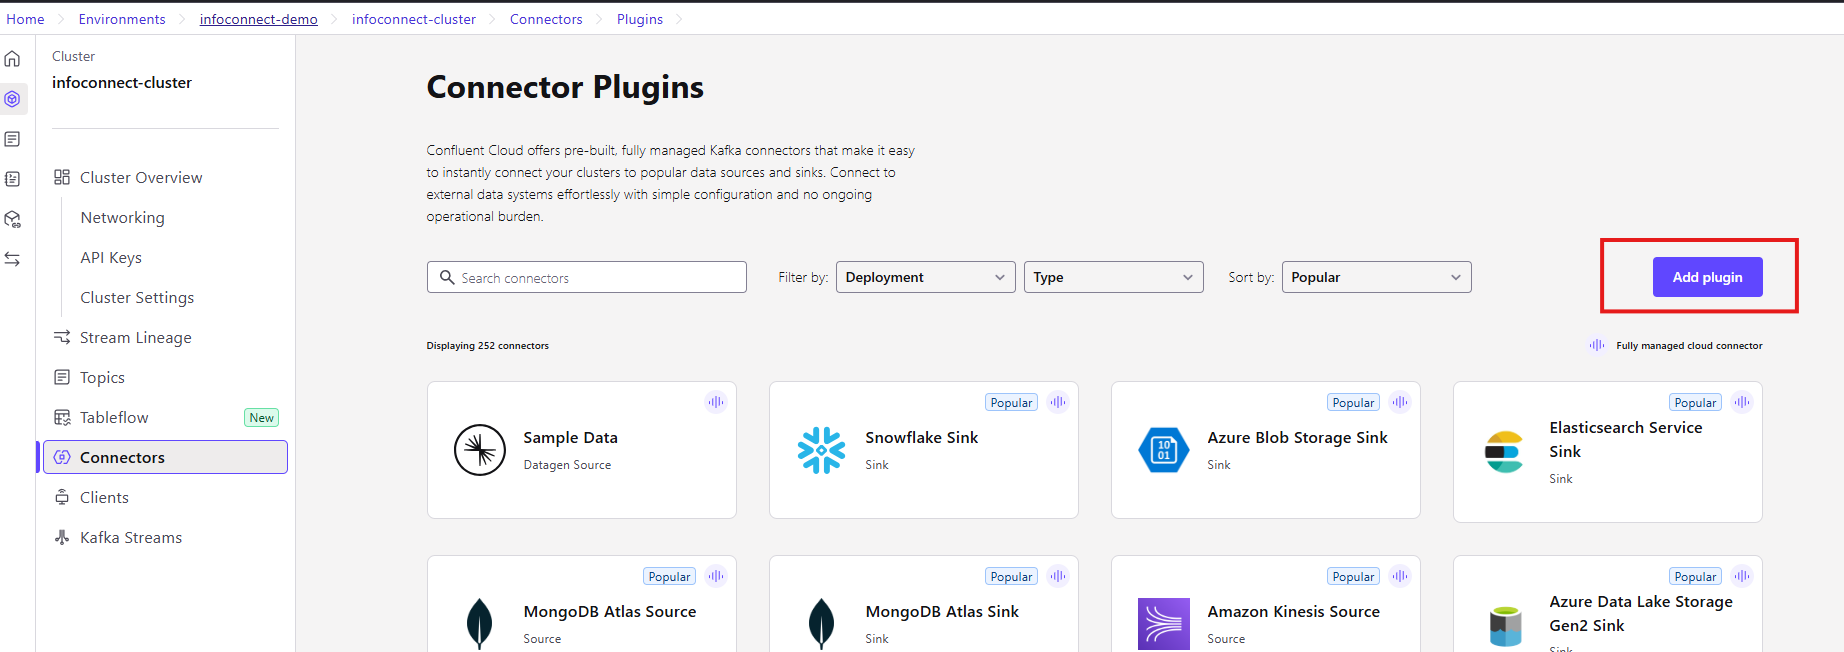
Upload the connector. In your Confluent Cloud account, go to Connectors and click Add plugin.
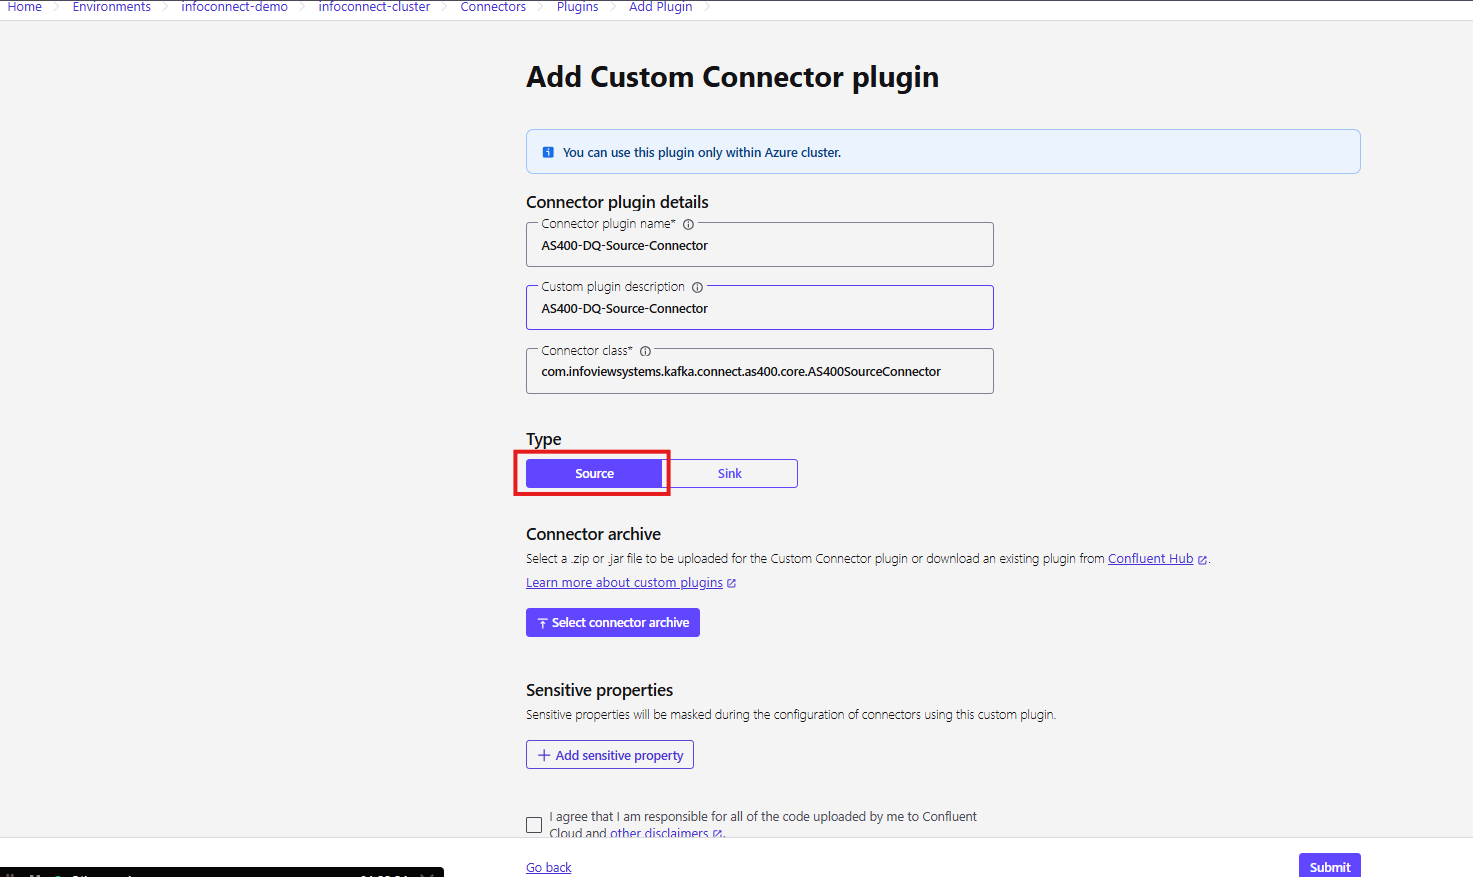
Fill in the requested details, upload the downloaded plugin ZIP file in the Select connector archive section, and click Submit. Use the following details for each connector:
Connector Plugin name and description Connector class Type AS400 Data Queue Source Connector AS400 Data Queue Source Connectorcom.infoviewsystems.kafka.connect.as400.core.AS400SourceConnectorSource AS400 Data Queue Sink Connector AS400 Data Queue Sink Connectorcom.infoviewsystems.kafka.connect.as400.core.AS400DataQueueSinkConnectorSink AS400 Program Call Sink Connector AS400 Program Call Sink Connectorcom.infoviewsystems.kafka.connect.as400.core.AS400ProgramCallSinkConnectorSink All three connectors are in a single ZIP file. You can use this file to upload all of them.
-
Configure the connector. After the upload, configure the connector in the Confluent Cloud UI. Provide the required configuration properties, such as
connector.class,key.converter,value.converter, and any other properties that your IBM i setup needs. For the properties of each connector, see Connector operations.
No Kafka broker or Kafka Connect infrastructure
If you do not operate any Kafka services, the easiest way to evaluate IBM i connectivity is to run the Kafka broker and Kafka Connect in a single environment. Follow the quick start guide of your preferred Kafka edition and vendor, for example:
- Apache Kafka quick start: follow the instructions up to step 6 (install Kafka Connect).
- Confluent Platform Docker quick start
- Confluent Cloud quick start
We recommend the simplest stand-alone configuration for the initial trial. Our engineering team can help you choose the topology and deployment model for the Kafka brokers and Kafka Connect components that fits your evaluation and your production target state.
When the Kafka broker and Kafka Connect are running, install the connector as described above. Then configure the IBM i connector operations.
If you run other messaging and middleware platforms, consider InfoConnect Hub. It is a self-contained, simplified IBM i integration component that surfaces IBM i business logic as REST APIs and supports the most popular messaging stacks. Contact us to discuss the best option.
Sample stand-alone Confluent Docker setup
The following procedure is one way to quickly set up the Kafka broker, Schema Registry, Kafka Connect, and the InfoConnect IBM i connectors with Confluent Platform components. Depending on your host OS and configuration, you may have to adjust the setup, for example to specify the fully qualified path to the license and truststore folder.
- Install Docker and review the sample Docker Compose file.
-
Download the InfoConnect license file
as400-license.licto a local directory and map it to/opt/, for example: -
Download and start all prerequisite components:
Verify that all services are running:

-
Verify that the license is copied to the
/opt/folder of the Docker image. Open a shell in theconnectcontainer:In the container shell, list the folder:
The license file appears in the list, as in the following screenshot.

-
Verify that the connector is installed. In the container shell, run:
The IBM i connector appears in the list, as in the following screenshot.

-
Open Confluent Control Center at
http://<environment-host>:9021. The connector list shows the AS400 Data Queue Source and Sink connectors and the Program Call Sink connector, as in the following screenshot.
Connection configuration properties
All connectors share the connection properties in this section. In the connector configuration form, they appear in the Connection, Connection (Optional), License, and Truststore sections.
Connection
| Parameter | Description | Mandatory | Default value | Configuration key |
|---|---|---|---|---|
| Name | Unique label for the connector in your application. | Required | AS400SourceConnectorConnector_0 | name |
| AS400 URL | IBM i system connection URL. | Required | null | as400.url |
| User Id | IBM i system user. | Required | null | as400.userId |
| PASSWORD | IBM i system connection password. | Required | null | as400.password |
| License protocol | See License management. | Required | null | as400.license.protocol |
| Truststore file protocol | See Truststore management. | Optional | null | Truststore file protocol |
| IASP | Independent auxiliary storage pool (logical partitions in the system). | Optional | null | as400.iasp |
| Library List | Libraries to add to the library list associated with the user ID. Separate the libraries with commas. They are added to the top of the library list. | Optional | null | as400.libraries |
| Secure Connection | Enables a secure connection to IBM i over an encrypted channel. | Optional | False | as400.secure.connection |
| Socket Timeout | Socket timeout in ms. The default value of -1 means that the default JVM SO_TIMEOUT is used. |
Optional | -1 | as400.socket.timeout |
| Time unit to be used for Socket Timeout | Time unit of the socket timeout. | Optional | MILLISECONDS | as400.socket.timeunit |
| Connection Retries | Number of times the connector retries to establish the connection internally before it throws an exception and passes it back to the Kafka connection manager. | Optional | 3 | as400.connection.retry |
| Reconnection Period | Time between internal reconnection retries in ms. | Optional | 60000 | as400.reconnection.period |
| Time unit to be used for Reconnection Period | Time unit of the reconnection period. | Optional | MILLISECONDS | as400.reconnection.timeunit |
| Connection Time to Live | Maximum time in seconds that the connection can be used. | Optional | 0 | as400.connection.live |
| Reconnection Period time out | Time unit used for the connection time to live. | Optional | SECONDS |
Connection (Optional)
| Parameter | Description | Mandatory | Default value | Configuration key |
|---|---|---|---|---|
| Operation Type | Operation type to perform on IBM i: FILE = 0, PRINT = 1, COMMAND = 2, DATAQUEUE = 3, DATABASE = 4, RECORDACCESS = 5, CENTRAL = 6, SIGNON = 7 | Optional | 2 | as400.operation.type |
| CCSID | Coded Character Set Identifier (CCSID), the numeric code of the character set used for character data on IBM i. | Optional | 0 | as400.ccsid |
| Pre Start Count Data Queue | Number of initial connections kept in the pool for data queue operations. This reduces the latency of the first operations. | Optional | 2 | as400.prestart.count.dq |
| Pre Start Count Command | Number of initial connections kept in the pool for running commands on IBM i. | Optional | 2 | as400.prestart.count.command |
| Cleanup Interval | Interval in ms at which the maintenance thread of the connection pool cleans up inactive or expired connections. | Optional | 300000 | as400.cleanup.interval |
| Max Connection | Maximum number of connections allowed in the connection pool. | Optional | 5 | as400.max.connection |
| Max Inactivity | Maximum time in ms that a connection can stay idle in the pool before the cleanup thread closes it. | Optional | 3600000 | as400.max.inactivity |
| Max Lifetime | Maximum lifetime in ms of a connection. After this time the connection is closed and replaced, regardless of activity. | Optional | 86400000 | as400.max.lifetime |
| Max Use Count | Maximum number of times that a connection can be used before it is closed and replaced. | Optional | -1 (no maximum) | as400.max.usecount |
| Max Use Time | Maximum time in ms that a connection can be used before it is closed and replaced. | Optional | -1 (no maximum) | as400.max.usetime |
| Pre-Test Connection | Indicates whether a connection is tested before it is handed out from the pool. This ensures that the connection is still active and ready to use. | Optional | true | as400.pretest.connection |
| Run Maintenance | Enables or disables the internal maintenance thread of the connection pool, which handles cleanup and pre-testing. | Optional | true | as400.run.maintenance |
| Thread Used | Indicates whether connections are bound to a specific thread, so that a thread always uses the same connection. | Optional | true | as400.thread.used |
| Keep Alive | Enables TCP keep-alive. It sends small packets to keep the connection open, so that firewalls do not drop it because of inactivity. | Optional | true | as400.keep.alive |
| Login Timeout | Time in ms to wait for a successful sign-on to the IBM i system. | Optional | 300000 | as400.login.timeout |
| Receive Buffer Size | Size of the socket receive buffer in bytes. | Optional | 10000 | as400.receive.buffer.size |
| Send Buffer Size | Size of the socket send buffer in bytes. | Optional | 10000 | as400.send.buffer.size |
| So Linger | Controls the socket linger behavior. When enabled, a close call blocks until all data is sent. | Optional | 0 | as400.so.linger |
| So Timeout | Timeout in ms for read operations on the socket. | Optional | 0 (infinite) | as400.so.timeout |
| TCP No Delay | Enables or disables the Nagle algorithm. When true, packets are sent immediately, which can improve performance for low-latency connections. |
Optional | true | as400.tcp.nodelay |
License management
InfoConnect for Kafka requires a valid license. Contact us to request a free trial license or to purchase a long-term license. The Infoview sales team provides a license file as400-license.lic that entitles you to work with specific IBM i servers.
You can store the license in various internal and shared locations. Set as400.license.protocol to the protocol that matches the location, then configure the parameters for that protocol. All parameters are required.
| Protocol | Parameter | Configuration key |
|---|---|---|
| FILE | Path | as400.license.path |
| FILE | Filename | license.fileName |
| S3 | S3 bucket path | s3.bucket |
| S3 | Filename | license.fileName |
| S3 | S3 region | s3.region |
| S3 | Access key | s3.accessKey |
| S3 | Secret key | s3.secretKey |
| S3_IAM | S3 bucket path | s3.bucket |
| S3_IAM | Filename | license.fileName |
| S3_IAM | S3 region | s3.region |
| FTP | Host | ftp.host |
| FTP | Directory path | ftp.dir.path |
| FTP | Filename | license.fileName |
| FTP | Username | ftp.username |
| FTP | Password | ftp.password |
| CLASSPATH | Filename | license.fileName |
| HTTP | HTTP Host | http.url |
| HTTP | HTTP Directory | http.dir.path |
| HTTP | Filename | license.fileName |
| HTTP | HTTP Username | http.username |
| HTTP | HTTP Password | http.password |
| HTTPS | HTTPS Host | https.url |
| HTTPS | HTTPS Directory | https.dir.path |
| HTTPS | Filename | license.fileName |
| HTTPS | HTTPS Username | https.username |
| HTTPS | HTTPS Password | https.password |
| BROKER | License Topic | license.licenseTopic |
| DIRECT | License Text | license.licenseText |
| AZURE_STORAGE | Azure Blob Connection String | azblob.connectionString |
| AZURE_STORAGE | Azure Blob Container Name | azblob.containerName |
| AZURE_STORAGE | Filename | license.fileName |
Truststore management
The IBM i connector requires the truststore file info400new.truststore when the secure connection property is set to true. The truststore enables access to specific IBM i systems over a TLS connection. You can load the truststore with several protocols, including HTTP, HTTPS, FTP, S3, FILE, and CLASSPATH. Configure the connector settings for the protocol you choose.
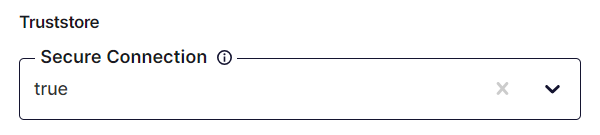
Configure the following parameters for the chosen protocol. All parameters are required.
| Protocol | Parameter | Configuration key |
|---|---|---|
| FILE | Path | as400.tlsFile.path |
| FILE | Filename | truststore.fileName |
| S3 | S3 bucket path | s3.bucket.tls |
| S3 | Filename | truststore.fileName |
| S3 | S3 region | s3.region.tls |
| S3 | Access key | s3.accessKey.tls |
| S3 | Secret key | s3.secretKey.tls |
| S3_IAM | S3 bucket path | s3.bucket.tls |
| S3_IAM | Filename | truststore.fileName |
| S3_IAM | S3 region | s3.region.tls |
| FTP | Host | ftp.host.tls |
| FTP | Directory path | ftp.dir.path.tls |
| FTP | Filename | truststore.fileName |
| FTP | Username | ftp.username.tls |
| FTP | Password | ftp.password.tls |
| CLASSPATH | Filename | license.fileName |
| HTTP | HTTP Host | http.url.tls |
| HTTP | HTTP Directory | http.dir.path.tls |
| HTTP | Filename | truststore.fileName |
| HTTP | HTTP Username | http.username.tls |
| HTTP | HTTP Password | http.password.tls |
| HTTPS | HTTPS Host | https.url.tls |
| HTTPS | HTTPS Directory | https.dir.path.tls |
| HTTPS | Filename | truststore.fileName |
| HTTPS | HTTPS Username | https.username.tls |
| HTTPS | HTTPS Password | https.password.tls |
| BROKER | Truststore Topic | truststore.truststoreTopic |
| AZURE_STORAGE | Azure Blob Connection String | azblob.connectionString.tls |
| AZURE_STORAGE | Azure Blob Container Name | azblob.containerName.tls |
| AZURE_STORAGE | Filename | truststore.fileName.tls |
Connector operations
The connector supports the following operations:
| Operation | Description |
|---|---|
| InfoCDC / Data Queue Source | The connector continuously monitors a designated data queue for new messages. |
| Data Queue Sink | The connector writes messages to a data queue. |
| Program Call Sink | The connector executes an IBM i program. |
| Screen Automation (RPA) Sink | Automates green screen user navigation. |
Source connector configuration properties
Configure the following source connector properties.
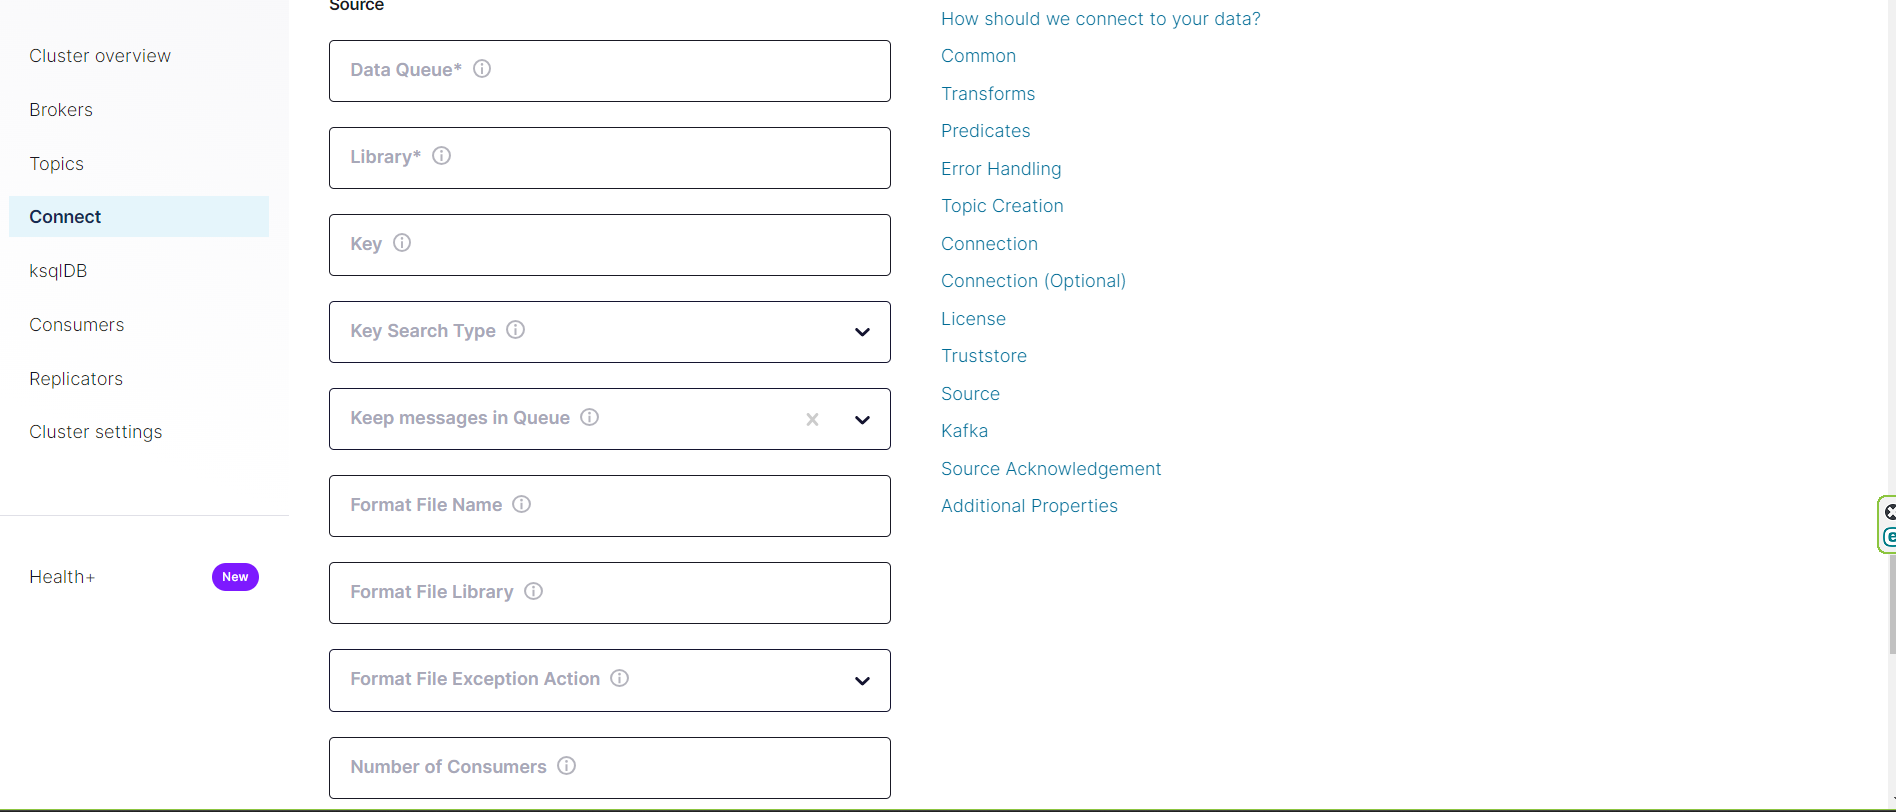
| Parameter | Description | Mandatory | Default value | Configuration key |
|---|---|---|---|---|
| Data Queue | Name of the data queue to read from. | Required | null | as400.read.dataqueue.name |
| Library | Library of the data queue to read from. | Required | null | as400.read.dataqueue.library |
| Key | Required for keyed data queues. Leave blank for non-keyed data queues. Used to read any message from the data queue. | Optional | null | as400.read.dataqueue.key |
| Key Search Type | Required for keyed data queues. Available search types: equal, not equal, greater than, less than, greater than or equal, less than or equal. | Optional | null | as400.read.dataqueue.key.search.type |
| Keep messages in Queue | Leave unchecked unless you want to leave the message in the queue after reading. | Optional | true | as400.source.keep.message |
| Format File Name | Treats the data queue entry as an externally defined data structure. When set, the connector dynamically retrieves the record format from the specified IBM i file and parses the received data queue entry into a map of field name / value pairs. The connector performs the type conversion and supports all types, such as packed and date / time. | Optional | null | as400.source.format.name |
| Format File Library | Library of the format file. If you do not specify it, the connector locates the format file through the connection library list. | Optional | null | as400.source.file.library |
| Format File Exception Action | Action when a message fails because of a format file error. The connector either discards the message or writes it back to the queue, depending on the option you select. | Optional | discard | as400.source.format.action |
| Is InfoCDC Configured | Set to true if InfoCDC is subscribed. |
Optional | true | as400.isInfoCDCConfigured |
| Is Sorting is required | Set to true if records must be sorted. |
Optional | true | as400.sort.records |
| Number of Consumers | Number of internal threads that poll data from the IBM i system in parallel. A higher value enables concurrent processing of data queue entries and improves performance by optimizing the internal thread pool handling of multi-threaded connector tasks. | Optional | 4 | as400.source.consumer.numbers |
| Read Concurrency | Number of concurrent executors that run for each consumer. | Optional | 0 | as400.source.concurrency |
| Poll interval | Poll interval in ms when the queue is empty. | Optional | 1000 | as400.source.poll.interval |
| Flush Percentage | Fraction of the buffered records that is flushed in each poll cycle. | Optional | 75 | as400.source.flush.percentage |
| Data Queue Wait Time | Number of seconds to wait when the queue contains no entries. | Optional | 0 | as400.source.dq.wait.time |
| Column Naming Strategy | Determines whether short column names or full (actual) column names are used. | Optional | SHORT | as400.source.column.naming.strategy |
| Overflow Handling Strategy | Controls how numeric overflow values are handled. IGNORE keeps the original value, which can cause problems downstream. MAP replaces the value with a safe default and stores the original value in OVERFLOW_MAP. |
Optional | IGNORE | as400.source.field.overflow |
| AS400 Logical Type Conversion Enabled | Enables or disables the conversion of IBM i date, time, and timestamp values into Kafka Connect logical types. | Optional | false | as400.logical.conversion.enabled |
| Date Format Pattern | Date format pattern. | Optional | "yyyy-MM-dd" | date.format.pattern |
| Time Format Pattern | Time format pattern. | Optional | "HH:mm:ss" | time.format.pattern |
| Timestamp Format Pattern | Timestamp format pattern. | Optional | "yyyy-MM-dd HH.mm.ss.SSS" | timestamp.format.pattern |
Date, time, and timestamp patterns
Valid date patterns:
- With different separators:
yyyy/MM/ddyyyy.MM.ddyyyy-MM-ddyyyy:MM:dd
- With interchanged date, month, and year:
yyyy-MM-ddMM-dd-yyyyyyyy-dd-MM
Valid time patterns:
HH:mm:ssHH.mm.ssHH/mm/ssHH-mm-ss
Valid timestamp patterns:
- With different separators:
yyyy/MM/dd HH:mm:ssyyyy-MM-dd HH.mm.ssyyyy-MM-dd HH.mm.ss.SSS
- With interchanged date, month, and year:
yyyy-MM-dd HH:mm:ssMM-dd-yyyy HH.mm.ssyyyy-dd-MM HH.mm.ss.SSS
Note
You can use the separators ., -, and / for the time part.
Source connector samples
The following samples show the source connector configuration for each converter.
Sample JSON for the source connector with JsonConverter
{
  "name": "AS400SourceConnector",
  "config": {
    "connector.class": "com.infoviewsystems.kafka.connect.as400.core.AS400SourceConnector",
    "key.converter": "org.apache.kafka.connect.storage.StringConverter",
    "value.converter": "org.apache.kafka.connect.json.JsonConverter",
    "as400.url": "your-ibm-i-host",
    "as400.userId": "your-username",
    "as400.password": "your-password",
    "as400.secure.connection": "false",
    "as400.license.protocol": "FILE",
    "as400.license.path": "/opt",
    "license.fileName": "as400-license.lic",
    "as400.read.dataqueue.name": "your-data-queue-name",
    "as400.read.dataqueue.library": "your-Library",
    "as400.source.format.name": "format-file-name",
    "as400.source.file.library": "your-format-file-library",
    "source.kafka.topic": "Test",
    "topic.creation.default.replication.factor": "1",
    "topic.creation.default.partitions": "1",
    "value.converter.schemas.enable": "false",
    "schema.validation.mode": "STRICT"

    /*Below are optional (Required if security enabled) */
    // "security.protocol": "SASL_SSL",
    // "sasl.mechanism": "PLAIN/SCRAM",
    // "sasl.jaas.config": "org.apache.kafka.common.security.plain.PlainLoginModule required username=\"<api-key>\" password=\"<api-secret>\";"
  }
}
Sample JSON for the source connector with JsonSchemaConverter and Schema Registry
{
  "name": "AS400SourceConnector",
  "config": {
    "connector.class": "com.infoviewsystems.kafka.connect.as400.core.AS400SourceConnector",
    "key.converter": "org.apache.kafka.connect.storage.StringConverter",
    "value.converter": "io.confluent.connect.json.JsonSchemaConverter",
    "as400.url": "your-ibm-i-host",
    "as400.userId": "your-username",
    "as400.password": "your-password",
    "as400.secure.connection": "false",
    "as400.license.protocol": "FILE",
    "as400.license.path": "/opt",
    "license.fileName": "as400-license.lic",
    "as400.read.dataqueue.name": "your-data-queue-name",
    "as400.read.dataqueue.library": "your-Library",
    "as400.source.format.name": "format-file-name",
    "as400.source.file.library": "your-format-file-library",
    "source.kafka.topic": "Test",
    "topic.creation.default.replication.factor": "1",
    "topic.creation.default.partitions": "1",
    "value.converter.schema.registry.url": "http://localhost:8081",
    "schema.validation.mode": "STRICT"

    /*Below are optional (Required if security enabled) */
    // "security.protocol": "SASL_SSL",
    // "sasl.mechanism": "PLAIN/SCRAM",
    // "sasl.jaas.config": "org.apache.kafka.common.security.plain.PlainLoginModule required username=\"<api-key>\" password=\"<api-secret>\";"
  }
}
Sample JSON for the source connector with AvroConverter and Schema Registry
{
  "name": "AS400SourceConnector",
  "config": {
    "connector.class": "com.infoviewsystems.kafka.connect.as400.core.AS400SourceConnector",
    "key.converter": "org.apache.kafka.connect.storage.StringConverter",
    "value.converter": "io.confluent.connect.avro.AvroConverter",
    "as400.url": "your-ibm-i-host",
    "as400.userId": "your-username",
    "as400.password": "your-password",
    "as400.secure.connection": "false",
    "as400.license.protocol": "FILE",
    "as400.license.path": "/opt",
    "license.fileName": "as400-license.lic",
    "as400.read.dataqueue.name": "your-data-queue-name",
    "as400.read.dataqueue.library": "your-Library",
    "as400.source.format.name": "format-file-name",
    "as400.source.file.library": "your-format-file-library",
    "source.kafka.topic": "Test",
    "topic.creation.default.replication.factor": "1",
    "topic.creation.default.partitions": "1",
    "value.converter.schema.registry.url": "http://localhost:8081",
    "schema.validation.mode": "STRICT"

    /*Below are optional (Required if security enabled) */
    // "security.protocol": "SASL_SSL",
    // "sasl.mechanism": "PLAIN/SCRAM",
    // "sasl.jaas.config": "org.apache.kafka.common.security.plain.PlainLoginModule required username=\"<api-key>\" password=\"<api-secret>\";"
  }
}
Reading from a keyed data queue
To read from a keyed data queue, specify the key and the search type with the as400.read.dataqueue.key and as400.read.dataqueue.key.search.type properties. Add them to any of the samples above:
"as400.read.dataqueue.key": "your-key",
"as400.read.dataqueue.key.search.type": "greater than or equal",
For example, as400.read.dataqueue.key=123 reads from a keyed data queue by the key 123, and as400.read.dataqueue.key.search.type=equal searches for entries where the key equals the specified value. You can replace equal with another search type: greater_than, less_than, not_equal, greater_than_or_equal, or less_than_or_equal.
Source acknowledgement
You can acknowledge a message in two ways: by writing an acknowledgement to the response data queue, or by calling a program with the necessary parameters.
To write an acknowledgement to a data queue, configure the following properties:
| Parameter | Description | Mandatory | Default value | Configuration key |
|---|---|---|---|---|
| Data Queue | Data queue to which the response is written. | Optional | null | as400.write.dataqueue.name |
| Library | Response data queue library. | Optional | null | as400.write.dataqueue.library |
| Is Keyed DataQ | Response data queue expression. | Optional | null | as400.write.dataqueue.key |
To call a program for the acknowledgement, configure the following properties:
| Parameter | Description | Mandatory | Default value | Configuration key |
|---|---|---|---|---|
| Program name | Name of the program. | Optional | null | as400.program.name |
| Program Library | Library of the program you want to invoke | Optional | null | as400.program.library |
| Program Library List | Library list. | Optional | null | as400.program.libraryList |
The following configuration sends the response through a program call. The programs INFOCDCCOM/CDCPGMACKR and INFOCDCCOM/CDCPGMACKB accept and process the acknowledgements.
"source.ack.type": "Program",
"as400.program.name": "CDCPGMACKR", // or "CDCPGMACKB"
"as400.program.library": "INFOCDCCOM",
"as400.program.libraryList": "INFOCDCCOM, INFOCDCDTA",
Data queue sink connector configuration properties
Configure the following data queue sink connector properties.
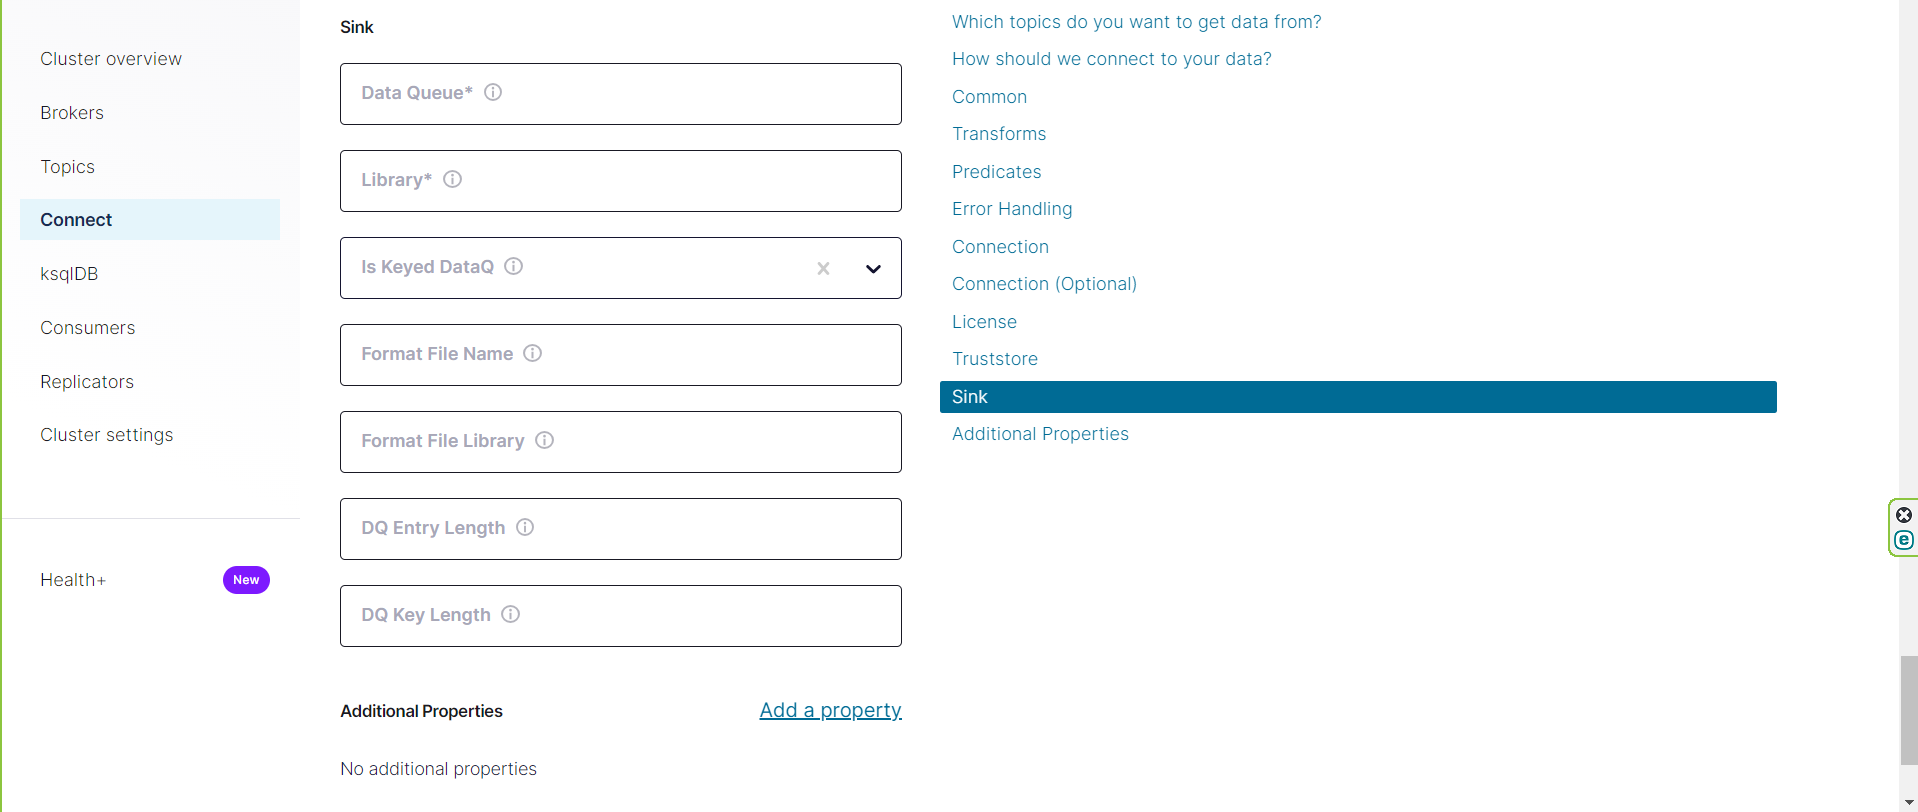
| Parameter | Description | Mandatory | Default value | Configuration key |
|---|---|---|---|---|
| Data Queue | Name of the data queue to write to. | Required | null | as400.write.dataqueue.name |
| Library | Library of the data queue to write to. | Required | null | as400.write.dataqueue.library |
| Is Keyed DataQ | Required for keyed data queues. Leave blank for non-keyed data queues. Used to read any message from the data queue. | Optional | false | as400.write.dataqueue.key |
| Format File Name | Treats the data queue entry as an externally defined data structure. When set, the connector dynamically retrieves the record format from the specified IBM i file and parses the received data queue entry into a map of field name / value pairs. The connector performs the type conversion and supports all types, such as packed and date / time. | Optional | null | as400.sink.format.name |
| Format File Library | Library of the format file. If you do not specify it, the connector locates the format file through the connection library list. | Optional | null | as400.sink.file.library |
| DQ Entry Length | Maximum data queue entry length. When specified and greater than 0, the value is truncated to fit the maximum length. | Optional | 0 | as400.dq.entry.length |
| DQ Key Length | Maximum data queue key length. When specified and greater than 0, this value is used instead of dynamically retrieving the key length from the data queue definition on the server. | Optional | null | as400.dq.key.length |
Data queue sink connector samples
The following samples show the sink connector configuration for each converter, including a dead letter queue (DLQ).
Sample JSON for the data queue sink connector with JsonConverter
{
  "name": "AS400DataQueueSinkConnectorConnector_0",
  "config": {
    "connector.class": "com.infoviewsystems.kafka.connect.as400.core.AS400DataQueueSinkConnector",
    "key.converter": "org.apache.kafka.connect.storage.StringConverter",
    "value.converter": "org.apache.kafka.connect.json.JsonConverter",
    "topics": "Test",
    "transforms": "",
    "errors.tolerance": "all",
    "errors.deadletterqueue.topic.name": "json_dlq",
    "errors.deadletterqueue.topic.replication.factor": "1",
    "errors.deadletterqueue.context.headers.enable": "true",
    "as400.url": "your-ibm-i-host",
    "as400.userId": "your-username",
    "as400.password": "your-password",
    "as400.secure.connection": "false",
    "as400.license.protocol": "FILE",
    "as400.license.path": "license-file-path",
    "license.fileName": "as400-license.lic",
    "as400.write.dataqueue.name": "your-data-queue-name",
    "as400.write.dataqueue.library": "your-library",
    "as400.sink.format.name": "format-file-name",
    "as400.sink.file.library": "format-file-library",
    "value.converter.schemas.enable": "false"

    /*Below are optional (Required if security enabled) */
    // "security.protocol": "SASL_SSL",
    // "sasl.mechanism": "PLAIN/SCRAM",
    // "sasl.jaas.config": "org.apache.kafka.common.security.plain.PlainLoginModule required username=\"<api-key>\" password=\"<api-secret>\";"
  }
}
Sample JSON for the data queue sink connector with JsonSchemaConverter and Schema Registry
{
  "name": "AS400DataQueueSinkConnectorConnector_0",
  "config": {
    "connector.class": "com.infoviewsystems.kafka.connect.as400.core.AS400DataQueueSinkConnector",
    "key.converter": "org.apache.kafka.connect.storage.StringConverter",
    "value.converter": "io.confluent.connect.json.JsonSchemaConverter",
    "topics": "Test",
    "transforms": "",
    "errors.tolerance": "all",
    "errors.deadletterqueue.topic.name": "jsonSchema-CDCDQ8_dlq",
    "errors.deadletterqueue.topic.replication.factor": "1",
    "errors.deadletterqueue.context.headers.enable": "true",
    "as400.url": "your-ibm-i-host",
    "as400.userId": "your-username",
    "as400.password": "your-password",
    "as400.secure.connection": "false",
    "as400.license.protocol": "FILE",
    "as400.license.path": "license-file-path",
    "license.fileName": "as400-license.lic",
    "as400.write.dataqueue.name": "your-data-queue-name",
    "as400.write.dataqueue.library": "your-library",
    "as400.sink.format.name": "format-file-name",
    "as400.sink.file.library": "format-file-library",
    "value.converter.schema.registry.url": "http://localhost:8081"

    /*Below are optional (Required if security enabled) */
    // "security.protocol": "SASL_SSL",
    // "sasl.mechanism": "PLAIN/SCRAM",
    // "sasl.jaas.config": "org.apache.kafka.common.security.plain.PlainLoginModule required username=\"<api-key>\" password=\"<api-secret>\";"
  }
}
Sample JSON for the data queue sink connector with AvroConverter and Schema Registry
{
  "name": "AS400DataQueueSinkConnectorConnector_0",
  "config": {
    "connector.class": "com.infoviewsystems.kafka.connect.as400.core.AS400DataQueueSinkConnector",
    "key.converter": "org.apache.kafka.connect.storage.StringConverter",
    "value.converter": "io.confluent.connect.avro.AvroConverter",
    "topics": "Test",
    "transforms": "",
    "errors.tolerance": "all",
    "errors.deadletterqueue.topic.name": "avro_dlq",
    "errors.deadletterqueue.topic.replication.factor": "1",
    "errors.deadletterqueue.context.headers.enable": "true",
    "as400.url": "your-ibm-i-host",
    "as400.userId": "your-username",
    "as400.password": "your-password",
    "as400.secure.connection": "false",
    "as400.license.protocol": "FILE",
    "as400.license.path": "license-file-path",
    "license.fileName": "as400-license.lic",
    "as400.write.dataqueue.name": "your-data-queue-name",
    "as400.write.dataqueue.library": "your-library",
    "as400.sink.format.name": "format-file-name",
    "as400.sink.file.library": "format-file-library",
    "value.converter.schema.registry.url": "http://localhost:8081"

    /*Below are optional (Required if security enabled) */
    // "security.protocol": "SASL_SSL",
    // "sasl.mechanism": "PLAIN/SCRAM",
    // "sasl.jaas.config": "org.apache.kafka.common.security.plain.PlainLoginModule required username=\"<api-key>\" password=\"<api-secret>\";"
  }
}
Writing to a keyed data queue
To write a response to a keyed data queue, you typically set the as400.write.dataqueue.key property to true. The property tells the connector to write the response data to a keyed data queue. Add it to any of the samples above:
Program Call sink connector configuration properties
Configure the following Program Call sink connector properties.

| Parameter | Description | Mandatory | Default value | Configuration key |
|---|---|---|---|---|
| Program Name | IBM i program name. | Required | null | as400.program.name |
| Program Library | Program library name. | Required | null | as400.program.library |
| Program Parameters | List of definitions and value references of the program parameters. | Optional | null | as400.program.parameters |
| Procedure Name | Name of the procedure. | Optional | null | as400.procedure.name |
| Procedure Returns Value | Indicates whether the program procedure returns a value. | Optional | false | as400.procedure.returnsValue |
| Threadsafe | Indicates whether the program is thread safe. | Optional | false | as400.threadsafe |
| Sink Target Topic | Topic to which the program call output is sent. | Optional | null | sink.kafka.topic |
| Fail Fast Connector on Program Call Exception | Indicates whether the connector fails fast on a program call exception. When false, the connector suppresses program call errors and moves the affected records to the dead letter queue, if one is configured. |
Optional | true | fail.fast.on.program.call.exception |
| Maximum Retries | Number of retry attempts after a connection failure. | Optional | 3 | max.retries |
| Retry Backoff Milliseconds | Time between retries in ms. | Optional | 10000 | retry.backoff.ms |
Sample JSON for the Program Call sink connector
{
  "name": "AS400ProgramCallSinkConnector",
  "config": {
    "connector.class": "com.infoviewsystems.kafka.connect.as400.core.AS400ProgramCallSinkConnector",
    "key.converter": "org.apache.kafka.connect.storage.StringConverter",
    "value.converter": "org.apache.kafka.connect.json.JsonConverter",
    "topics": "CRTORDER_INPUT",
    "as400.url": "your-ibm-i-host",
    "as400.userId": "your-username",
    "as400.password": "your-password",
    "as400.secure.connection": "false",
    "as400.license.protocol": "FILE",
    "as400.license.path": "license-file-path",
    "license.fileName": "as400-license.lic",
    "as400.program.name": "program-name",
    "as400.program.library": "KFKDEMOS",
    "as400.program.libraryList": "comma-separated-list-of-libraries",
    "as400.program.parameters": "{ \"params\": [ { \"parameterName\": \"sourceOrderId\", \"sourceFieldName\": \"$['sourceOrderId']\", \"dataType\": \"PACKED\", \"length\": 8, \"decimalPositions\": 0, \"usage\": \"INOUT\", \"count\": 1, \"dataStructureElements\": [] }, { \"parameterName\": \"targetOrderId\", \"sourceFieldName\": \"$['targetOrderId']\", \"dataType\": \"PACKED\", \"length\": 8, \"decimalPositions\": 0, \"usage\": \"INOUT\", \"count\": 1, \"dataStructureElements\": [] }, { \"parameterName\": \"orderAmt\", \"sourceFieldName\": \"$['orderAmt']\", \"dataType\": \"PACKED\", \"length\": 10, \"decimalPositions\": 2, \"usage\": \"INOUT\", \"count\": 1, \"dataStructureElements\": [] }, { \"parameterName\": \"orderStatus\", \"sourceFieldName\": \"$['orderStatus']\", \"dataType\": \"STRING\", \"length\": 10, \"decimalPositions\": 0, \"usage\": \"INOUT\", \"count\": 1, \"dataStructureElements\": [] }, { \"parameterName\": \"numberOfLines\", \"sourceFieldName\": \"$['noOfItems']\", \"dataType\": \"PACKED\", \"length\": 4, \"decimalPositions\": 0, \"usage\": \"IN\", \"count\": 1, \"dataStructureElements\": [] }, { \"parameterName\": \"orderLines\", \"sourceFieldName\": \"$['linesIn']\", \"dataType\": \"STRUCTURE\", \"length\": 0, \"decimalPositions\": 0, \"usage\": \"INOUT\", \"count\": 10, \"dataStructureElements\": [ { \"parameterName\": \"itemNo\", \"sourceFieldName\": \"$['itemNo']\", \"dataType\": \"STRING\", \"length\": 10, \"decimalPositions\": 0, \"usage\": \"INOUT\", \"count\": 1, \"dataStructureElements\": [] }, { \"parameterName\": \"quantity\", \"sourceFieldName\": \"$['quantity']\", \"dataType\": \"PACKED\", \"length\": 5, \"decimalPositions\": 0, \"usage\": \"INOUT\", \"count\": 1, \"dataStructureElements\": [] }, { \"parameterName\": \"price\", \"sourceFieldName\": \"$['price']\", \"dataType\": \"PACKED\", \"length\": 10, \"decimalPositions\": 2, \"usage\": \"INOUT\", \"count\": 1, \"dataStructureElements\": [] } ] } ] }",
    "as400.threadsafe": "false",
    "value.converter.schemas.enable": "false"

    /*Below are optional (Required if security enabled) */
    // "security.protocol": "SASL_SSL",
    // "sasl.mechanism": "PLAIN/SCRAM",
    // "sasl.jaas.config": "org.apache.kafka.common.security.plain.PlainLoginModule required username=\"<api-key>\" password=\"<api-secret>\";"
  }
}
Calling programs and service programs
When you call a program (*PGM object), you typically do not need to specify a procedure name. Programs are generally standalone units of code that run without calling a specific procedure.
Service programs (*SRVPGM objects) are designed to be reused by multiple programs and can contain multiple exported procedures that you can call individually. To run a specific procedure of a service program, set as400.procedure.name to the exported name of that procedure.
Add the following properties to the sample above to call a procedure:
Defining the program parameters
The following definition describes the parameters of the IBM i program used in the sample:
 d main            pr                  extpgm('CRTORDER')
 d  srcOrder                      8p 0
 d  trgtOrder                     8p 0
 d  ordAmt                       10p 2
 d  ordSts                       10a
 d  nbrLines                      4p 0
 d    linesIn                          likeds(linesInFmt) dim(10)

 d linesInfmt      DS                  Dim(10) qualified
 d   itemNo                      10a
 d   qty                          5p 0
 d   price                       10p 2
The input message in the Kafka topic has the following structure:
{
    "sourceOrderId": 11934700,
    "targetOrderId": 11934700,
    "orderAmt": 1000.00,
    "orderStatus": "Activated",
    "noOfItems": 2,
    "linesIn": [
        {
            "itemNo": "111",
            "quantity": 10,
            "price": 10.00
        },
        {
            "itemNo": "222",
            "quantity": 90,
            "price": 10.00
        }
    ]
}
Transform the program parameters into the following as400.program.parameters structure:
Sample JSON for the program parameters
{
    "params": [
        {
            "parameterName": "sourceOrderId",
            "sourceFieldName": "$['sourceOrderId']",
            "dataType": "PACKED",
            "length": 8,
            "decimalPositions": 0,
            "usage": "INOUT",
            "count": 1,
            "dataStructureElements": []
        },
        {
            "parameterName": "targetOrderId",
            "sourceFieldName": "$['targetOrderId']",
            "dataType": "PACKED",
            "length": 8,
            "decimalPositions": 0,
            "usage": "INOUT",
            "count": 1,
            "dataStructureElements": []
        },
        {
            "parameterName": "orderAmt",
            "sourceFieldName": "$['orderAmt']",
            "dataType": "PACKED",
            "length": 10,
            "decimalPositions": 2,
            "usage": "INOUT",
            "count": 1,
            "dataStructureElements": []
        },
        {
            "parameterName": "orderStatus",
            "sourceFieldName": "$['orderStatus']",
            "dataType": "STRING",
            "length": 10,
            "decimalPositions": 0,
            "usage": "INOUT",
            "count": 1,
            "dataStructureElements": []
        },
        {
            "parameterName": "numberOfLines",
            "sourceFieldName": "$['noOfItems']",
            "dataType": "PACKED",
            "length": 4,
            "decimalPositions": 0,
            "usage": "IN",
            "count": 1,
            "dataStructureElements": []
        },
        {
            "parameterName": "orderLines",
            "sourceFieldName": "$['linesIn']",
            "dataType": "STRUCTURE",
            "length": 0,
            "decimalPositions": 0,
            "usage": "INOUT",
            "count": 10,
            "dataStructureElements": [
                {
                    "parameterName": "itemNo",
                    "sourceFieldName": "$['itemNo']",
                    "dataType": "STRING",
                    "length": 10,
                    "decimalPositions": 0,
                    "usage": "INOUT",
                    "count": 1,
                    "dataStructureElements": []
                },
                {
                    "parameterName": "quantity",
                    "sourceFieldName": "$['quantity']",
                    "dataType": "PACKED",
                    "length": 5,
                    "decimalPositions": 0,
                    "usage": "INOUT",
                    "count": 1,
                    "dataStructureElements": []
                },
                {
                    "parameterName": "price",
                    "sourceFieldName": "$['price']",
                    "dataType": "PACKED",
                    "length": 10,
                    "decimalPositions": 2,
                    "usage": "INOUT",
                    "count": 1,
                    "dataStructureElements": []
                }
            ]
        }
    ]
}
Note
The field names of the input structure must match the respective sourceFieldName values so that the connector can map the values.
Stringify this structure to use it as the value of as400.program.parameters:
{ \"params\": [ { \"parameterName\": \"sourceOrderId\", \"sourceFieldName\": \"$['sourceOrderId']\", \"dataType\": \"PACKED\", \"length\": 8, \"decimalPositions\": 0, \"usage\": \"INOUT\", \"count\": 1, \"dataStructureElements\": [] }, { \"parameterName\": \"targetOrderId\", \"sourceFieldName\": \"$['targetOrderId']\", \"dataType\": \"PACKED\", \"length\": 8, \"decimalPositions\": 0, \"usage\": \"INOUT\", \"count\": 1, \"dataStructureElements\": [] }, { \"parameterName\": \"orderAmt\", \"sourceFieldName\": \"$['orderAmt']\", \"dataType\": \"PACKED\", \"length\": 10, \"decimalPositions\": 2, \"usage\": \"INOUT\", \"count\": 1, \"dataStructureElements\": [] }, { \"parameterName\": \"orderStatus\", \"sourceFieldName\": \"$['orderStatus']\", \"dataType\": \"STRING\", \"length\": 10, \"decimalPositions\": 0, \"usage\": \"INOUT\", \"count\": 1, \"dataStructureElements\": [] }, { \"parameterName\": \"numberOfLines\", \"sourceFieldName\": \"$['noOfItems']\", \"dataType\": \"PACKED\", \"length\": 4, \"decimalPositions\": 0, \"usage\": \"IN\", \"count\": 1, \"dataStructureElements\": [] }, { \"parameterName\": \"orderLines\", \"sourceFieldName\": \"$['linesIn']\", \"dataType\": \"STRUCTURE\", \"length\": 0, \"decimalPositions\": 0, \"usage\": \"INOUT\", \"count\": 10, \"dataStructureElements\": [ { \"parameterName\": \"itemNo\", \"sourceFieldName\": \"$['itemNo']\", \"dataType\": \"STRING\", \"length\": 10, \"decimalPositions\": 0, \"usage\": \"INOUT\", \"count\": 1, \"dataStructureElements\": [] }, { \"parameterName\": \"quantity\", \"sourceFieldName\": \"$['quantity']\", \"dataType\": \"PACKED\", \"length\": 5, \"decimalPositions\": 0, \"usage\": \"INOUT\", \"count\": 1, \"dataStructureElements\": [] }, { \"parameterName\": \"price\", \"sourceFieldName\": \"$['price']\", \"dataType\": \"PACKED\", \"length\": 10, \"decimalPositions\": 2, \"usage\": \"INOUT\", \"count\": 1, \"dataStructureElements\": [] } ] } ] }
The configuration for the Program Call sink connector is now ready to deploy.
Schema Registry configuration
Configure Schema Registry when you use schema converters, to avoid problems when you register updated schemas after you update a format file.
The schema converters are:
- Avro:
io.confluent.connect.avro.AvroConverter - JSON Schema:
io.confluent.connect.json.JsonSchemaConverter
To avoid schema registration errors, set the schema compatibility level to NONE in one of the following ways.
Option 1: Confluent Control Center
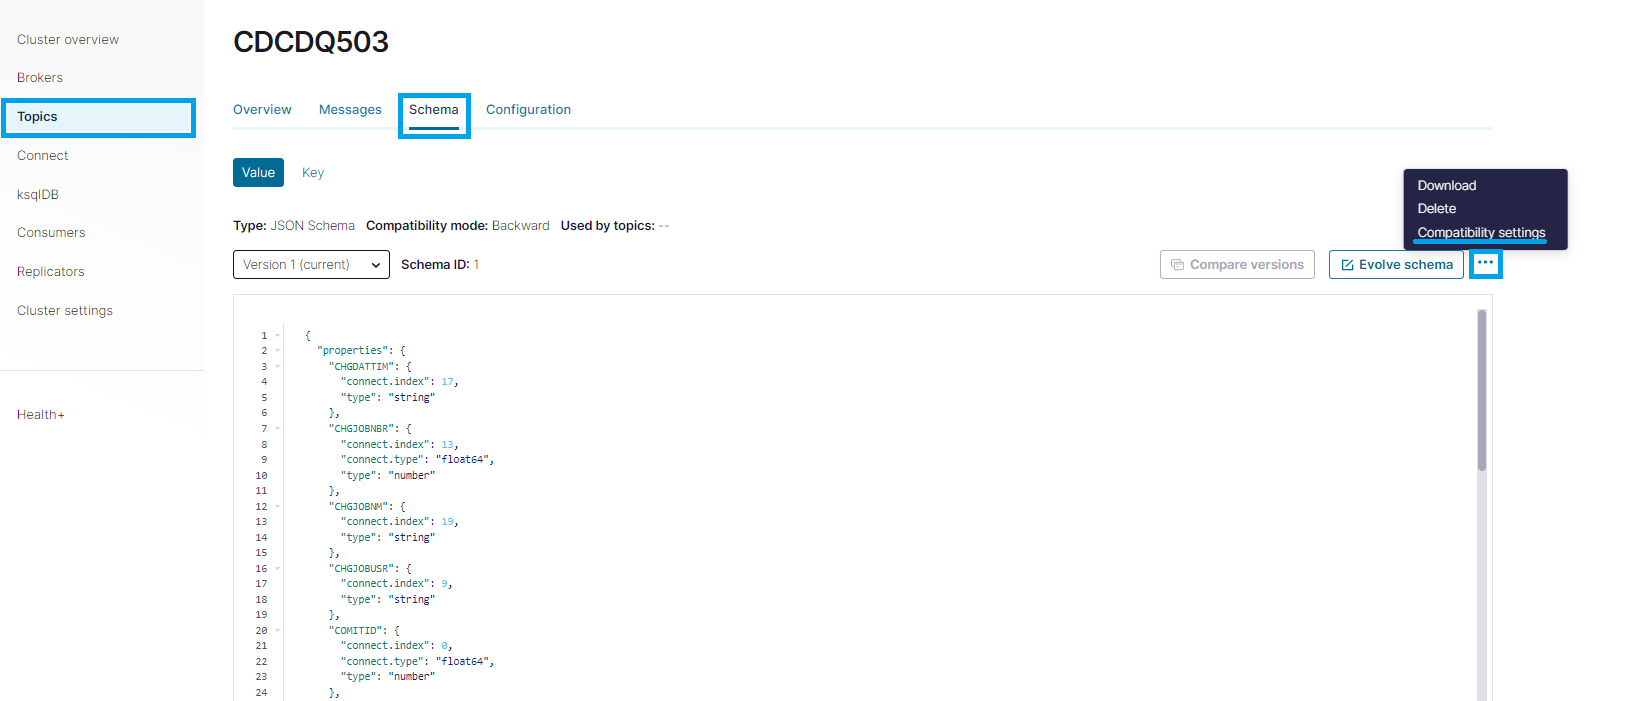
- Open the Topics menu and select the topic to which the connector publishes messages.
- Select the Schema tab to see the registered schema.
-
Open the ... menu and select Compatibility settings.
-
Select None as the compatibility level and save the changes.
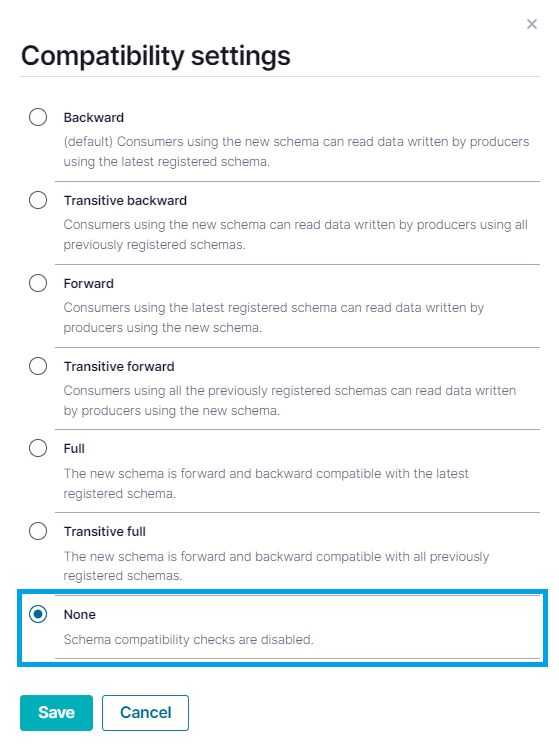
This change applies only to the edited topic. If other topics publish messages with a schema, repeat these steps for each of them, or use option 2 or 3 to change the default for all new topics.
Option 2: Confluent Platform properties file
- Open the Confluent installation folder and go to the
/etc/schema-registry/folder. -
Open the
schema-registry.propertiesfile for editing: -
Add the following property at the end of the file:
-
Save the changes. Restart Confluent Platform if needed to apply them.
New schemas use the compatibility level NONE by default.
Option 3: Docker Compose file
-
Add the following property to the
environmentsection of theschema-registrycontainer: -
If needed, restart the Docker container to apply the change:
New schemas use the compatibility level NONE by default.
Storing the license and truststore certificate in a topic
Follow these steps to store the license and the truststore certificate in a Kafka topic.
Step 1: Encode the files as base64
Generate a base64 string for each file with the command line. Copy each string to a text file, because you need it in step 3.
For the license file:
Sample command:
The output is a base64 string. The value depends on the content of the license file.
QxMTViODZlYTlkMDE1ZWE0ZTI1YTg5MzFhNDI0YjUzYjc1YmUwNDE1OGJjODRkMgphZGJlMTM3MTRhYjJhYTE0NjQxOWRmYzVlNDRjNWMyZDdmNTMzNTBhNDJhMWE5MTQ0NDRmN
For the truststore file:
Sample command:
The output is a base64 string. The value depends on the content of the truststore file.
Step 2: Create the topic
Create the topic that stores the license and truststore:
bin/kafka-topics.sh --create \
    --bootstrap-server <broker-address> \
    --topic <license-truststore-topic-name> \
    --partitions 1 \
    --replication-factor 3 \
    --config cleanup.policy=compact
    --config retention.ms=-1
Step 3: Produce the license and truststore to the topic
You can store the license and the truststore in the same topic. Use one of the following ways to produce the base64 strings to the topic.
Using the Kafka console producer
Run the producer:
kafka-console-producer --bootstrap-server localhost:9092 \
                       --topic <license-truststore-topic-name> \
                       --property parse.key=true \
                       --property key.separator=":"
At the prompt, enter one message for the license and one for the truststore:
Using Confluent Control Center
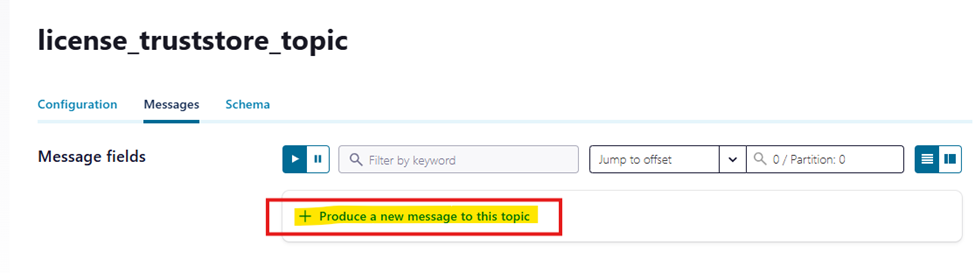
- Open the topic and select the Messages tab.
-
Select Produce a new message to this topic.
-
For the license, enter the base64 license string as the value and
"license"as the key.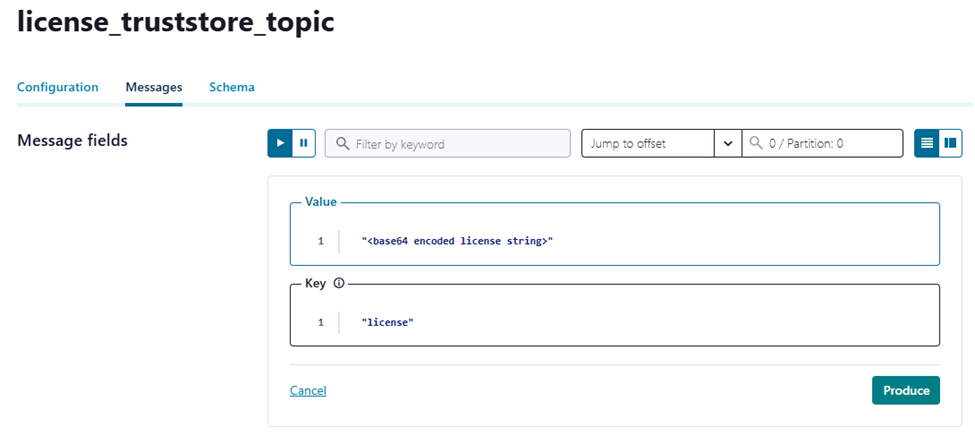
-
For the truststore, enter the base64 truststore string as the value and
"truststore"as the key.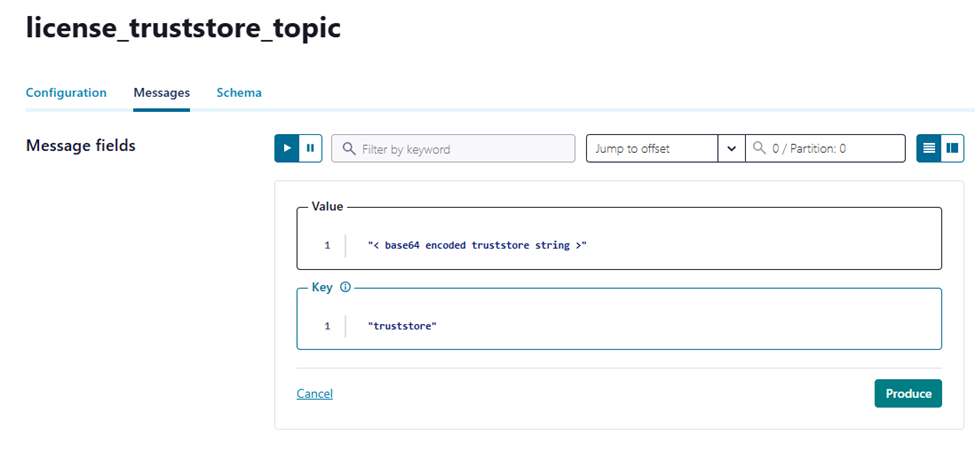
Note
The key of the record must be "license" for the license and "truststore" for the truststore.
Step 4: Configure the connector
In the connector configuration:
- Set
"as400.license.protocol": "BROKER"and"as400.tls.protocol": "BROKER". - Set the license topic:
"license.licenseTopic": "<license-topic-name>". - Set the truststore topic:
"truststore.truststoreTopic": "<truststore-topic-name>".
Sample configuration:
{
  //other properties are removed for brevity
  "as400.license.protocol": "BROKER",
  "as400.tls.protocol": "BROKER",
  "license.licenseTopic": "<license-topic-name>",
  "truststore.truststoreTopic": "<truststore-topic-name>"
}
Encrypting secrets and storing them in a topic
Step 1: Download the Secret Manager
Download SecretManager-1.0.0.jar and place it in your working directory.
Step 2: Create the input file
The input.json file contains your secrets and the Kafka properties. Create the file:
Add your secrets to the secrets object, as in the following sample:
{
  /* add your secrets in "secrets" json object. Please refer some sample properties mentioned below*/
  "secrets": {
    "as400-user": "<ibm-i-user>",
    "as400-password": "<ibm-i-password>"
  },
  "kafka": {
    "bootstrap.servers": "localhost:9092"
    /*Below are optional (Required if security enabled) */
    // "security.protocol": "SASL_SSL",
    // "sasl.mechanism": "PLAIN/SCRAM",
    // "sasl.jaas.config": "org.apache.kafka.common.security.plain.PlainLoginModule required username=\"<api-key>\" password=\"<api-secret>\";"
  }
}
Step 3: Create the topic
Create the topic that stores the secrets:
bin/kafka-topics.sh --create \
    --bootstrap-server <broker-address> \
    --topic <secrets-topic-name> \
    --partitions 1 \
    --replication-factor 3 \
    --config cleanup.policy=compact
    --config retention.ms=-1
Step 4: Produce the secrets to the topic
Produce the secrets to the topic with SecretManager-1.0.0.jar:
java -jar /path/to/SecretManager/SecretManager-1.0.0.jar <encryption-key> <input-json-file-path> <output-json-file-path> <secrets-topic>
Sample command:
java -jar /home/appadmin/secrets/SecretManager-1.0.0.jar 12345678912345 input.json output.json secrets_topic
After the secrets are produced to the topic, the output.json file contains the encrypted values.
Step 5: Configure the secrets in the connector
Sample configuration:
{
    /*other properties are removed for brevity*/
    "as400.userId": "as400-user",
    "as400.password": "as400-password"
}
To use an external secret store such as HashiCorp Vault, AWS Secrets Manager, Google Secret Manager, or Azure Key Vault, see the documentation of the respective secret management tool for the integration with Kafka Connect.
Configuring the environment variable config provider
-
Add the
EnvVarConfigProviderconfiguration provider. Add the following properties to yourconnect-distributed.propertiesfile:config.providers=env config.providers.env.class=org.apache.kafka.common.config.provider.EnvVarConfigProviderNote
The
EnvVarConfigProviderclass is available inkafka-clients3.5.0. -
Set the environment variables on your Linux machine with one of the following methods.
Method 1: export the variable directly.
Method 2: add the
exportcommand to~/.bash_profileor~/.bashrc. -
Use the environment variables in the connector configuration:
Routing messages from a single data queue to multiple topics
To route messages from a single data queue to multiple topics, first point several tables to the same data queue on the IBM i side. Then configure the data queue source connector.
Point multiple tables to a single data queue
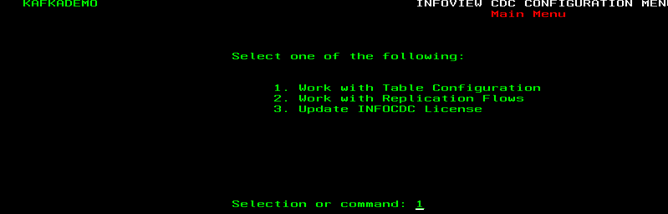
This procedure assumes that the tables you want to route are already added in InfoCDC.
-
Open the InfoCDC screen and select option 1.
-
Point the tables to a single data queue. In this example, three tables are routed to the data queue
CDCDQ301. The tablesORDERDTLandORDERHDRcurrently point toCDCDQ323andCDCDQ281. Point both of them toCDCDQ301.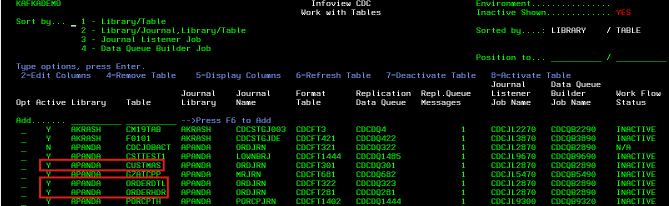
- Stop the workflow for all three tables.
-
Select option 2 (Edit Columns) for the table
ORDERDTL, change the DQ name toCDCDQ301, and press F10 to update.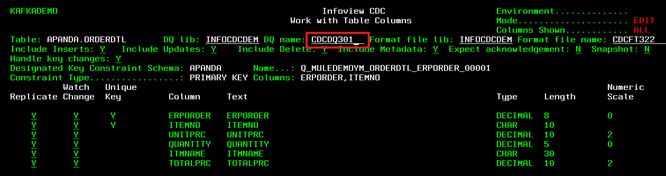
-
Press F10 again to apply the change.
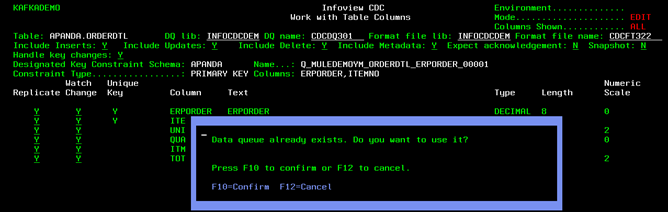
-
Press F5 to refresh and make sure that the replication data queue is now
CDCDQ301instead ofCDCDQ323. - Repeat steps 1 to 4 for the table
ORDERHDR. - Start the workflows for all three tables.
-
Check that all three tables point to the single data queue
CDCDQ301.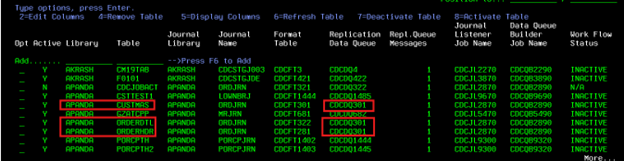
Configure the data queue source connector
Configure the data queue source connector to route messages from the single data queue, including messages from different tables, to their respective topics:
- Do not set the format file name and the format file library. The connector picks them dynamically.
- Add the property
"source.multiTopic": "true". -
The connector generates the topic names dynamically, using the following naming convention:
For example:
T_INFOCDCDEM_ORDERDTL.
Sample data queue source connector configuration:
{
   {
     /* other properties are removed for brevity */
     "as400.read.dataqueue.name": "CDCDQ301",
     "as400.read.dataqueue.library": "INFOCDCDEM",
     "source.multiTopic": "true",
     "source.kafka.topic": "POC_ ",
   }
}
Custom single message transforms (SMTs)
Deleting records by event type
The DeleteByEventType single message transform (SMT) sends a tombstone message (a Kafka record with a non-null key and a null value) for delete events. The SMT checks the event type and sends a tombstone message if the event type is DELETE. For example:
{
  "name": "AS400DataQueueSourceConnector_0",
  "config": {
    "connector.class": "com.infoviewsystems.kafka.connect.as400.core.AS400DataQueueSourceConnector",
    "key.converter": "io.confluent.connect.avro.AvroConverter",
    "value.converter": "io.confluent.connect.avro.AvroConverter",
    "source.kafka.topic": "Test",
    "transforms": "deleteByEventType",
    "transforms.deleteByEventType.type": "com.infoviewsystems.kafka.connect.as400.transformer.DeleteByEventType$Value",
    // Other properties...
  }
}
Reordering columns in the payload
You can reorder the columns in the payload with the custom single message transform (SMT) ReorderFields. The fields.order value is a comma-separated list of column names in the desired order. For example:
{
  "name": "AS400DataQueueSourceConnector_0",
  "config": {
    "connector.class": "com.infoviewsystems.kafka.connect.as400.core.AS400DataQueueSourceConnector",
    "key.converter": "io.confluent.connect.avro.AvroConverter",
    "value.converter": "io.confluent.connect.avro.AvroConverter",
    "source.kafka.topic": "Test",
    "transforms": "ReorderFields",
    "transforms.ReorderFields.type": "com.infoviewsystems.kafka.connect.as400.transformer.ReorderFields",
    "transforms.ReorderFields.fields.order": "field1,field2,field3", // Specify the desired column order here
    // Other properties...
  }
}
- Replace
field1,field2, andfield3with the actual column names in the order you want. The SMT rearranges the columns in the output payload accordingly. - If you use Schema Registry, the schema is updated with the new column order, so the topic gets a new schema and version. To avoid breaking existing consumers, set the schema compatibility to
NONEin the Schema Registry settings. This allows the schema update without breaking existing consumers. Later you can change the compatibility toBACKWARDorFORWARDas required.
Logging exceptions
The connector can log all critical exceptions to a dedicated topic (as400-error-log). To enable this, set log.exceptions=true. The default value is false, which means the connector does not log exceptions to the topic.
Contact us
Contact us for connector pricing, trial licenses, or support questions.