Overview
The common IBM i (AS400, iSeries) use case is to share the application data with other systems. In this article, I will show how easy it is to build IBM i Data API with Mulesoft Anypoint. We will define our RAML API first then add the code to pull data directly from DB2 database using the standard Database connector and IBM i database driver. Depending on the complexity and design of IBM i application, the persistent data must be transformed through complex business rules first before it can be used by consuming applications. In this case, API implementation must execute IBM i programs that implement such business logic – we will do it in the follow-up post.
It may appear at first that creating API adds more work and operational overhead compared to point-to-point integrations. Based on our experience, however, building out API layers is one of the most efficient ways to promote reuse and security, and govern and monitor the access to application data and logic. Relatively small upfront investment results in greatly improved delivery speed, especially as the number of interfaces grows.
Data Model
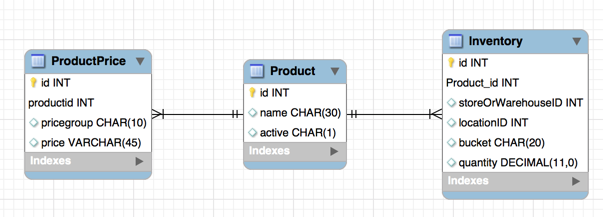
Suppose our sample application database model consists of 3 tables – products, product prices and inventory.
The script can be found here. It can be executed with any SQL client such as SquirrelSQL or using RUNSQLSTM command on IBM i. It generates the database structure and seeds it with sample data.
Product Price API and Implementation
Designing and building an IBM i data API with Mulesoft Anypoint is pretty straightforward and includes the following steps:
- Create RAML API definition in API Designer or Anypoint Studio
- Generate Mule implementation stubs from RAML in Anypoint Studio
- Define Database Select and connection settings in Anypoint Studio with Generic Database connector
- Define transformation rules with Data Weave in Anypoint Studio
RAML Definition
Create api.raml file in src/main/api folder or in Anypoint API Designer. Our product price lookup RAML is very simple – the real life project will most likely include more involved resources, the schema, security, pagination/filtering / sort order parameters and / or HATEOAS links.
[code]#%RAML 0.8

title: Product Pricing

version: 1.0

/products/{productname}:

get:

responses:

200:

body:

text/json:

example: |

{

"productName": "TV",

"productID": 3,

"productPrices": [{

"priceGroup": "REGULAR",

"productPrice": 500.00

}, {

"priceGroup": "SALE",

"productPrice": 450.00

}]

}[/code]
Once the RAML definition is ready, in the spirit of TDD approach we can run it as a mock service in API designer and then create test scripts with Postman or other API testing tools. This would also be a good time to share RAML and use cases with other developers/teams via API Notebook and get their feedback.
Mule implementation
Define Maven dependency in pom.xml
[code]<dependency>

<groupId>net.sf.jt400</groupId>

<artifactId>jt400</artifactId>

<version>8.5</version>

</dependency>[/code]
If not using Maven, download IBM i DB2 JDBC driver jt400.jar from http://jt400.sourceforge.net/ and add it to the project build path.
Generate Mule flows from RAML. Right-click on api.raml and select Mule -> Generate flows from RAML. After the flow stubs are generated, run the project as Mule application. The API will run inside Anypoint Studio and return sample data defined in RAML.
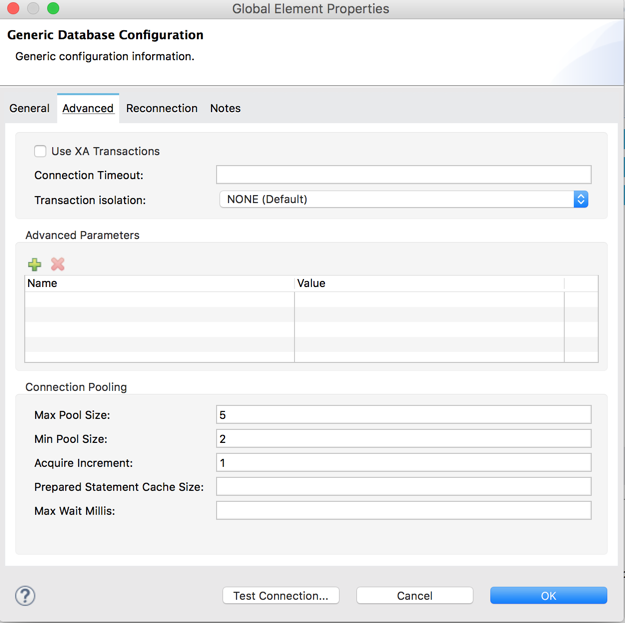
Define database connector configuration
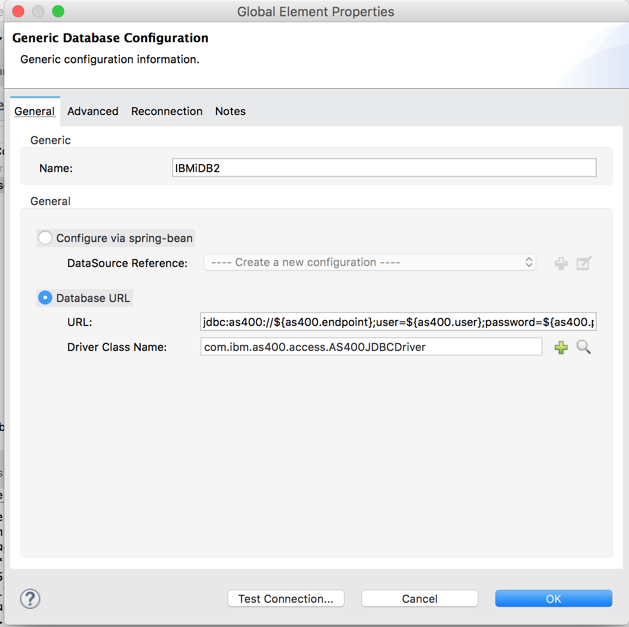
Make sure to set up connection pooling with an adequate number of threads to keep the connections open between subsequent requests. Opening a new connection to IBM i DB2 is an expensive operation!
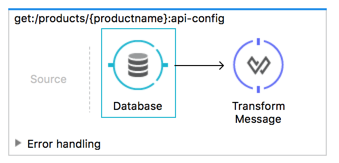
Now it’s time to implement our auto-generated API flow get:/products/{productname}. The resulting flow is very simple and consists of just three steps – retrieve product data from the database, then transform the results, then set the HTTP status to 200 (success) or 404 (not found).
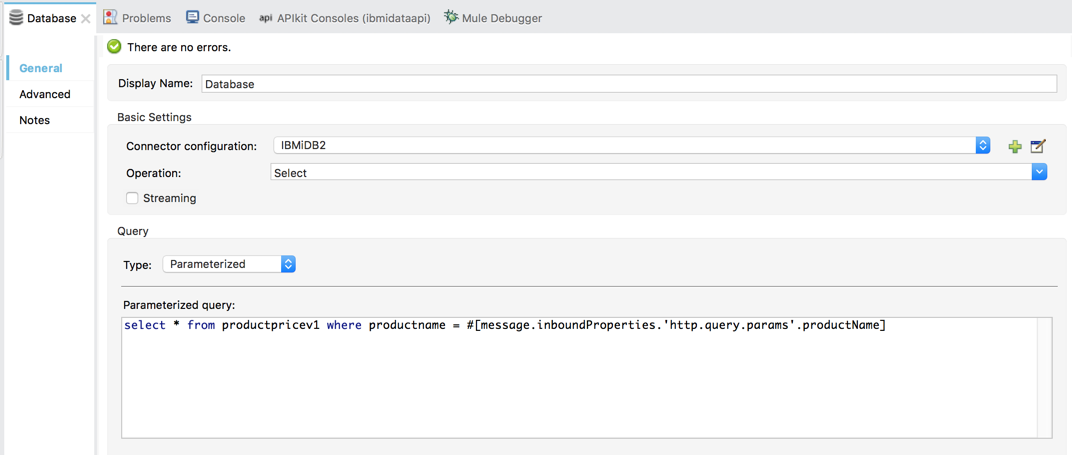
First, open main/app/api.xml, in the get:/products/{productname} flow remove the auto-generated Set Payload processor and instead add the Database connector. We will use the HTTP query parameter productName as a key to pull all prices for a given product.

Add Transform Message DataWeave next to the database connector:
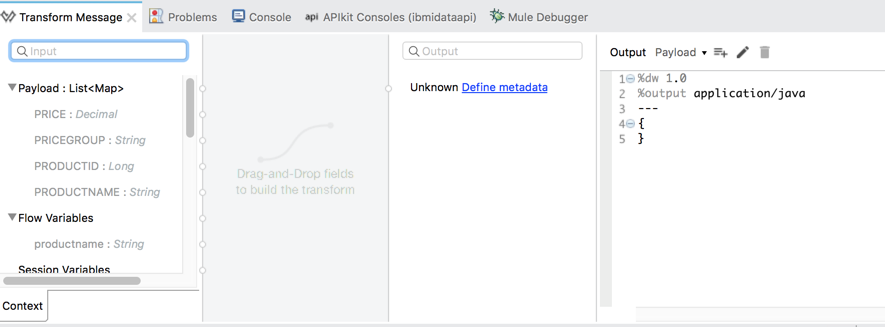
We can see that input property are pre-populated from the database table structure, but the output format is not defined.

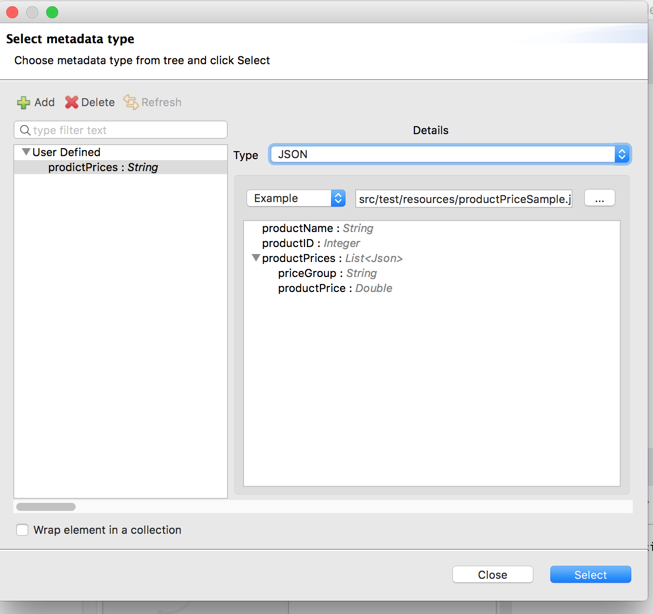
Save sample json output from API definition into a file /src/test/resources/productPriceSample.json
On the Transformation Properties screen, click on Define Metadata and add a new metadata configuration, set the type to JSON, and a select the sample file.
Select the definition then use it to map (drag) input to output elements.
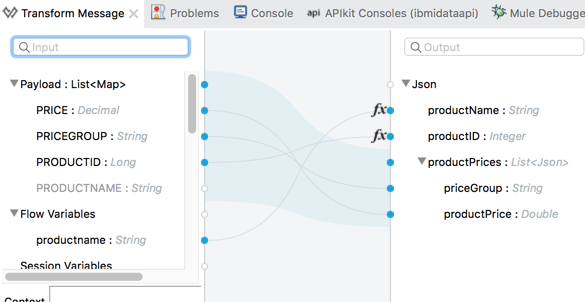
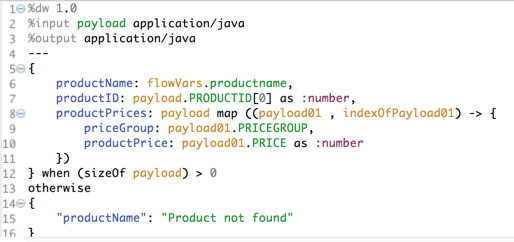
Note that the input is a list of records returned by the resultset, and the output is a complex structure with “header” level product name and ID and “detail” level pricegroup and price. I wish DataWeave UI would be smart enough to recognize it but it’s not quite there yet. So we will have to make a few tweaks to the auto-generated mapping in the mapping code.
- Change output format from %output application/json to %output application/java
- Replace productID: payload.PRODUCTID as :number with productID: payload.PRODUCTID[0] as :number – this will use the product ID from the first result record.
- Return productName = “Product not found” when database select returned no records
The resulting transformation should look like this:
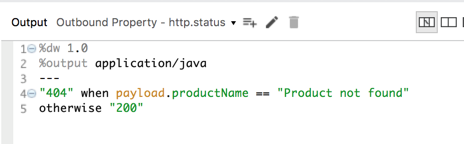
Finally, we need to set HTTP status to 200 (success) or 404 (not found). There are several ways to do it, here I am going to use DataWeave.
Add another Transform Message to the flow, in the output add a property with name http.status, and remove payload. This will ensure that the payload value built on the previous step remains intact and we just set the correct HTTP status here.
The mapping is very simple – I check the value of productName field set on the previous step. If it’s “Product not found” then it sets the http.status to 404 otherwise defaults to 200.
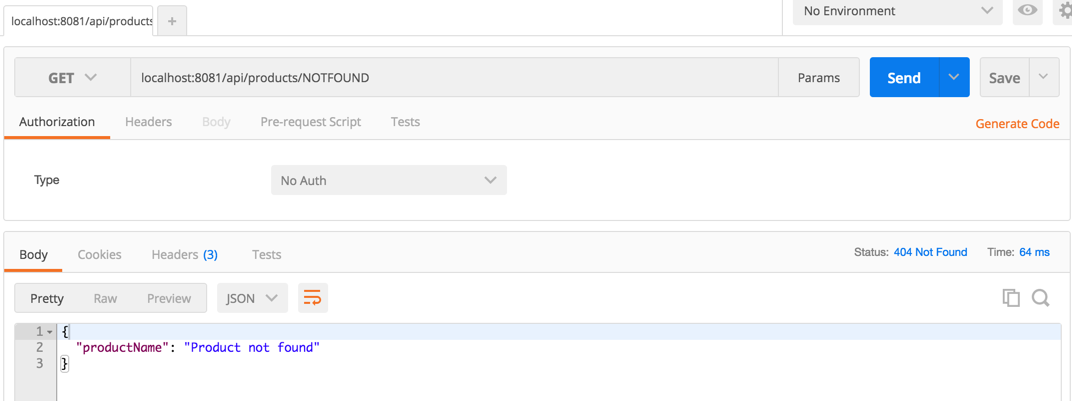
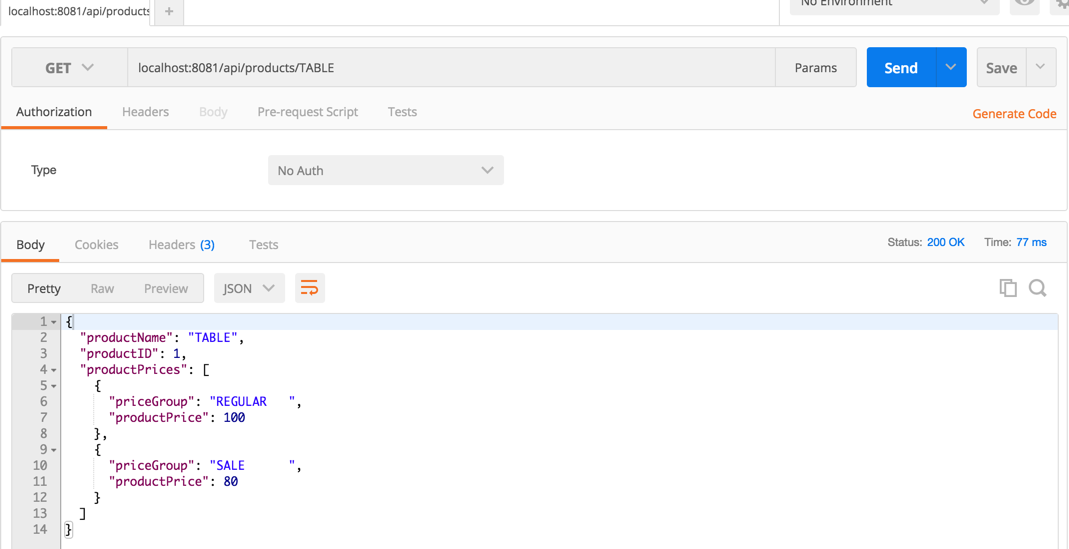
Run Mule application and test it with Postman or API console:
Now run it for product NOTFOUND:

Considerations
Wouldn’t it be nice if all real-life projects were as simple as how-to guides like this one? As always, the devil is in the details! Here are some things to
API design and operations
- Testing – create API test scripts and plug them into CI / CD tool
- Security and Policies – set up application access to the API along with rate limiting and other policies, by default use HTTPS endpoints unless there’s a compelling reason not to
- Schemas/models – create external resource type definitions that can be reused by multiple APIs.
- Add filters / sorting / pagination and / or HATEOAS links. Pagination and filtering are important as they help clients request and get only relevant information and avoid shuffling large volumes of data to and from with little value. HATEOAS links help simplify/streamline the control flow logic on the client.
- Community Engagement – post the API definition to the company’s Anypoint Exchange with references to API Notebook to make it easy for various teams to discover and consume.
Security
- DB2 for IBM i JDBC driver supports SSL / TLS encrypted connections. The certificate must be configured on IBM i and imported into each client application’s trust store to accommodate SSL handshakes (read this blog post for more details)
- Access to the IBM i database from clients outside the network generally should not be allowed. Communicate with IBM i via a proxy server (for more information see https://www.ibm.com/support/knowledgecenter/ssw_ibm_i_72/rzahh/proxies.htm)
- Use application-specific user IDs defined with limited read-only access to application data. Optionally create read-only views for external access and restrict remote users’ access to everything else.
Performance
- Pool and reuse connections across multiple requests for high-volume real-time interfaces. Each time a new connection is open, it starts a new QZDASOINIT / QZDASSINIT communication job on IBM i, which is an expensive operation.
- Analyze DB2 for i query access plan, create new indexes if needed based on index advisor recommendations to tune complex select statements
- Use read blocking for selects and commit blocks for inserts/updates to process records in chunks for large data volumes
- Configure application-specific IBM i subsystems to segregate communication jobs QZDASOINIT / QZDASSINIT, instead of running all interface jobs in QUSRWRK subsystem
- Proxy server configuration and encrypted communication with SSL can negatively impact the interface performance
Conclusions
Building IBM i data API with Mulesoft Anypoint is a straightforward task involving standard API and Mule development. We created RAML API definition in API Designer or Anypoint studio, generated Mule flows from RAML, added database select, defined and tweaked a bit the mapping rules for payload and HTTP status code, and that was really it! A reasonable integration developer should be able to implement similar APIs in less than an hour or in some cases in a matter of minutes, focusing mostly on RAML design, DB extract and transformation rules.
The complete example can be found at https://github.com/infoviewsystems/IBMi-Mule-Data-API
The Legacy databases are famous for complex non-normalized data models that require applying complex business rules before the data can be exposed to other systems. In most cases, the IBM i application already has programs that implement this logic. In these scenarios, instead of accessing DB, the Mule applications should call IBM i program. In the next article, I will walk through this use case.
Recent Comments